How To Guide: How to Prepare Strawberry Jam
Introduction:
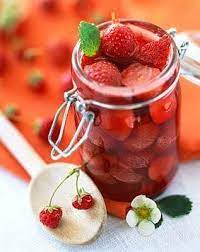
Strawberry jam is a delightful and versatile spread that can elevate the simplest of dishes. Whether you want to enjoy it on toast, use it as a filling for pastries or as a topping for your favorite desserts, making your own strawberry jam at home is a rewarding and straightforward process. In this guide, I will walk you through the step-by-step method of preparing delicious and homemade strawberry jam.
Ingredients:
To prepare strawberry jam, you will need the following ingredients:
- 4 cups of fresh strawberries
- 2 cups of granulated sugar
- 2 tablespoons of lemon juice
- 1 teaspoon of lemon zest (optional, for added flavor)
Equipment:
To make the process easier, gather these equipment and utensils:
- A large saucepan
- A wooden spoon
- A potato masher or fork
- A candy thermometer (optional)
- Clean and sterilized jars with airtight lids
Step 1: Preparing the Strawberries
- Start by washing the fresh strawberries under cold water. Remove the green stems and any blemishes.
- Take a potato masher or a fork and gently mash the strawberries to your desired consistency. You can leave them slightly chunky or mash them completely depending on how you like your jam.
Step 2: Cooking the Strawberries
- Transfer the mashed strawberries to a large saucepan and add the granulated sugar, lemon juice, and lemon zest (if using) to the pan.
- Place the saucepan over medium heat and stir the mixture until the sugar dissolves completely.
- Bring the mixture to a boil, stirring occasionally to prevent it from sticking to the bottom of the pan.
Step 3: Testing for Gel Point
- If you have a candy thermometer, insert it into the mixture and cook until the temperature reaches 220°F (104°C). This is the gel point, which ensures that your jam sets properly. If you do not have a candy thermometer, you can perform a spoon test.
- To do the spoon test, place a small amount of the mixture on a chilled spoon and let it cool for a few seconds. Push your finger through the jam; if it wrinkles and holds its shape, it has reached the gel point. If it's still runny, continue cooking for a few more minutes and repeat the test.
Step 4: Canning the Jam
- While the jam is cooking, prepare your jars by washing them in hot, soapy water and rinsing them thoroughly. Submerge them in boiling water for a few minutes to sterilize them. Ensure the lids are also clean and sterilized.
- Once the jam has reached the gel point, remove the saucepan from heat and skim off any foam that may have formed on the surface.
- Carefully ladle the hot jam into your clean jars, leaving about ¼ inch of headspace at the top.
- Wipe the jar rims with a clean, damp cloth, ensuring there are no residue or spills that could interfere with the sealing process.
- Place the lids on tightly and process the jars in a boiling water bath for 10 minutes to create a proper seal. Ensure the jars are fully submerged in boiling water.
- After processing, carefully remove the jars from the water bath and let them cool on a towel-lined countertop. You may hear the satisfying "pop" of the lids sealing as they cool.
- Once the jars have cooled completely, check the seals by pressing the center of each lid. If it doesn't pop back, the seal is secure. Any unsealed jars should be refrigerated and consumed within a few weeks.
Conclusion:
With just a few simple steps, you can create a delectable batch of homemade strawberry jam. Enjoy it on your morning toast, use it as a filling in pastries or share it with friends and family as a delightful gift. The sweet and tangy flavors of freshly made strawberry jam are sure to bring joy to your kitchen. Get creative and experiment with different additions like mint or vanilla to customize the flavor to your liking. Happy jam-making!


 Admin
Admin 


